Automagically Incrementing UE Project Version Numbers

What problem are we solving today?
We’d like to automatically increment our Unreal Engine’s Project Version number every time we build. Any game of any scale eventually has to handle bug reports, binary compatibilities in multiplayer etc etc. A unique build identifier is incredibly useful during development when code changes hourly. Many games watermark screen captures with the build number.
A search online reveals a partial solution from the UE messages boards. It works by incrementing the version # every time the build target CS rebuilds. That’s not quite the same. TargetRules are not re-instantiated on every build. So, let’s come up with a better solution. In fact, let’s come up with a big-studio pro-level solution. That means integrating our system with version control (for game projects, typically Perforce). (Even one-person studios can use perforce - it’s free for small teams, so why would you not?)
Breaking it down
Dividing, conquering
Let’s sketch out our solution before giving it a go, shall we?
Sequence:
- Run code when a build happens
- Read the project’s version number from disk
- Increment it
- If perforce is available, check out the file(s) that need to be updated
- Save the file to disk
- Submit the file to perforce (if appropriate)
Sounds like a plan.
But first, where do we write our code? UE C++? Blueprints? Or…?
There are a number of options. One easy and flexible way (particularly on Windows) is to write a small C# console app which can be invoked in the build process. It can interact with perforce via the “p4api.net library”. An example of this is here.
Another option would be C++ and Unreal Engine. Our code could be implemented as a UE Commandlet. When your game builds from the UE Editor, much of the build process runs as commandlets. That seems like a very UE-way of doing things, so let’s do it this way. We can touch on the C# way afterwards.
An even more “Unreal” plan might be editor scripting with python. If you’re python-literate, great! However, if you’re developing in UE C++, you already know UE and C++ by definition. You may not know python. So, let’s do this the UE C++ way.
Running code as part of the build
Step 1: Launching a Pre-Build batch file
We want to launch a batch file when the project builds. Super easy. We’re already doing it in another post. See:
Adding Third-Party Libraries - Part 3
For additional flexibility, let’s simply call a batch file every time our project builds. We can let the batch file sort out how to increment the build number. It’s easier to test, easier to tweak. Let’s pass the project directory as an input parameter to the batch file.
So, in our MyProjectEditor.Target.cs file, we’ll add this to the constructor:
// (added to MyProject.Target.Build.cs and MyProjectEditor.Target.Build.cs)
// Prebuild step to increment version #.
if (Target.Platform == UnrealTargetPlatform.Win64)
{
     PreBuildSteps.Add("$(ProjectDir)\\Automation\\PreBuildSteps.bat $(ProjectDir)");
}
Before Unreal Engine invokes the PreBuildSteps, it will expand $(ProjectDir) to the Project’s root directory.
And then, we’ll just put our batch file in an Automation subdirectory of the project and we’re on our way. To test that this works, just make a simple batch file that dumps a timestamp into a log file, like:
REM This batch file runs every time our unreal engine project executes
REM Parameter %1 is our UE project directory
echo Running custom PreBuildSteps
echo PreBuildSteps [%DATE% %TIME%] >> %1/Automation/AutomationLog.txt
And, after building in visual studio twice (first rebuilds the TargetRules after the Pre-Build Steps have already executed, so the batch file won’t actually run until you build it again):
Build started...
...
1>Running custom PreBuildSteps
(Visual Studio Output. The batch file executed!!)
C:\AutoVersionNumbers\Automation>dir
Directory of C:\AutoVersionNumbers\Automation

02/11/2023  10:06 AM    <DIR>          .
02/11/2023  10:06 AM    <DIR>          ..
02/11/2023  10:06 AM                90 AutomationLog.txt
02/11/2023  10:06 AM               222 PreBuildSteps.bat
               2 File(s)            312 bytes

C:\AutoVersionNumbers\Automation>type AutomationLog.txt

PreBuildSteps [Sat 02/11/2023 10:06:51.62]
(The log entry!!)
So far, so good! We can now run a batch file that does anything we want.
Step 2: Launching a UE Commandlet
Now, let’s find a commandlet tutorial online and start our UE Commandlet. Let’s just have it update the log file and return. This way, we can make sure it’s executing.
AutoVersionCommandlet.h:
#include "Commandlets/Commandlet.h"
#include "AutoVersionCommandlet.generated.h"

UCLASS()
class UAutoVersionCommandlet : public UCommandlet
{
    GENERATED_BODY()

    virtual int32 Main(const FString& Params) override;
};
AutoversionCommandlet.cpp:
#include "AutoVersionCommandlet.h"
#include "HAL/PlatformFileManager.h"
#include "GenericPlatform/GenericPlatformFile.h"
#include "Misc/Paths.h"

int32 UAutoVersionCommandlet::Main(const FString& Params)
{
    FString LogFilePath = FPaths::Combine(FPaths::ProjectDir(), TEXT("Automation/AutomationLog.txt"));

    IPlatformFile& file = FPlatformFileManager::Get().GetPlatformFile();
    IFileHandle* handle = file.OpenWrite(*LogFilePath, true, true);
    if (handle)
    {
        FString CommandletLogString = "AutoVersionCommandlet was here.\n";
        handle->Write((const uint8*)TCHAR_TO_ANSI(*CommandletLogString), CommandletLogString.Len());
        delete handle;
    }

    return 0;
}
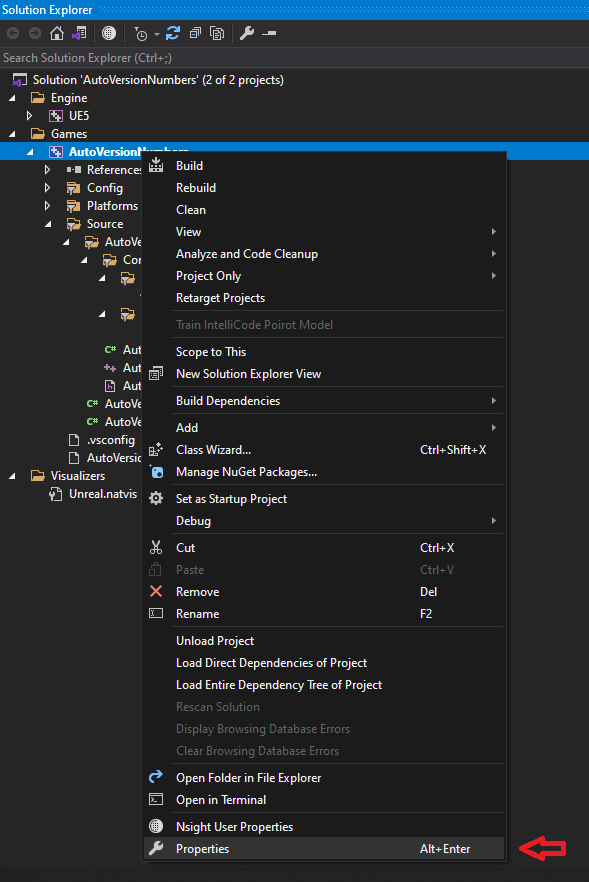
We can test or debug the commandlet in isolation from visual studio by adding -run=AutoVersionCommandlet to the command line. To do so, in Solution Exploder, right click the project under “Games” to view its Properties.
Add -run=AutoversionCommandlet to the Command Arguments and OK it.
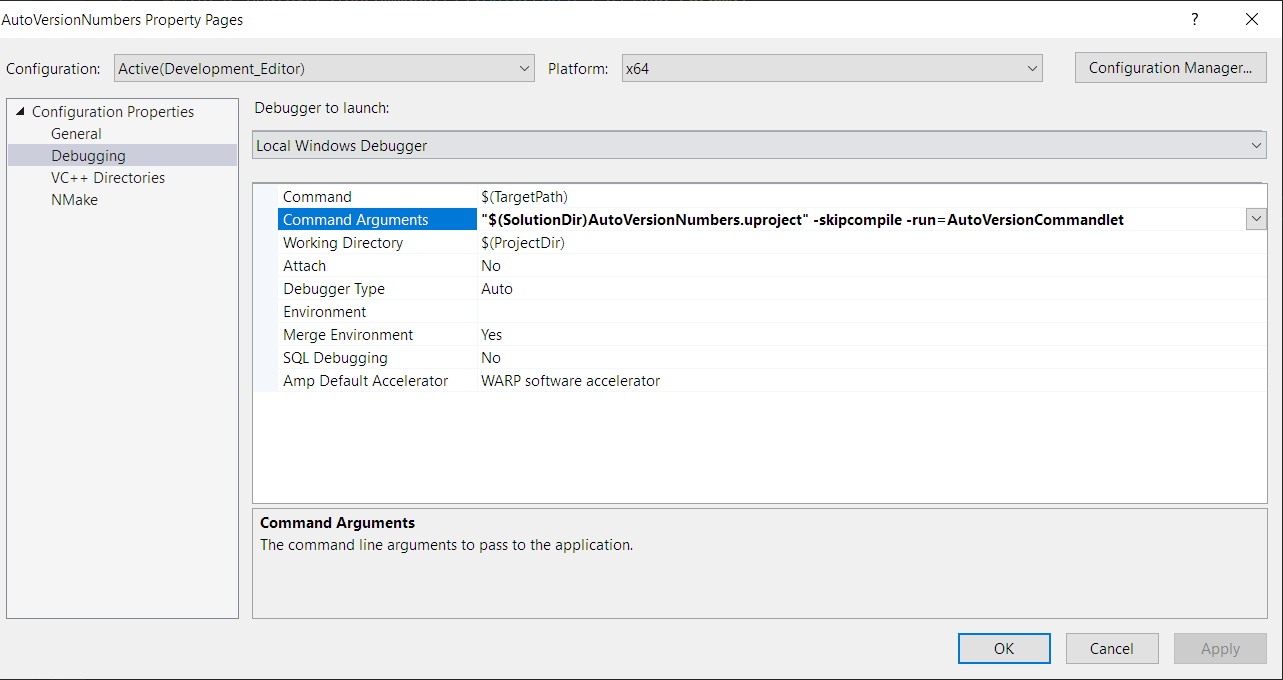
Great! Control+Shift+B to recompile. F5 to launch. If all goes well, instead of launching the editor you’ll see a command window launch. Afterwards, check the log file and you’ll see the commandlet found the correct directory and appended to the log.
C:\AutoVersionNumbers\Automation>type AutomationLog.txt

PreBuildSteps [Sat 02/11/2023 10:06:51.62]
AutoVersionCommandlet was here.
The commandlet worked!! It updated the log file.
(Don’t forget to remove -run=AutoVersionCommandlet from the Command Arguments when you want to go back to launching the Editor.)
Invoking the commandlet from our batch file
Similar to $(ProjectDir), which Unreal Engine expands out to be the project directory, there’s an $(EngineDir) which expands to the Unreal Engine directory.
So, let’s refine the prebuild step in our AutoVersionNumbersEditor.Target.cs file to pass $(EngineDir), the path to the UE editor, as the FIRST parameter to our batch file. The project directory becomes our second parameter:
// Prebuild step to increment version #.
if (Target.Platform == UnrealTargetPlatform.Win64)
{
    PreBuildSteps.Add("$(ProjectDir)\\Automation\\PreBuildSteps.bat \"$(EngineDir)\\Binaries\\Win64\\UnrealEditor.exe\" \"$(ProjectDir)\"");
}
And, we’ll need to edit our PreBuildSteps.bat file to call the editor to invoke our commandlet:
REM First parameter is expected to be path to UnrealEditor.exe, and the second the path to the project directory.
set UEEditor=%1
set ProjectDirectory=%2

REM This batch file runs every time our unreal engine project executes
REM Parameter %1 is our UE project directory
echo Running custom PreBuildSteps
echo PreBuildSteps [%DATE% %TIME%] >> %ProjectDirectory%/Automation/AutomationLog.txt

REM save the working directory
pushd .

REM change the working directory to the project directory
cd %ProjectDirectory%

REM invoke the UE commandlet
%UEEditor% %ProjectDirectory%/AutoVersionNumbers.uproject -skipcompile -run=AutoVersionCommandlet

REM restore the previous working directory
popd
You can test the batch file by passing your path to the UE Editor as the first parameter and your project directory as the second.
If you build a time or two you’ll find now, before the build, the commandlet is called.
Half way there, right? Now all we have to do is write the rest of the commandlet.
Commandlet code
The Project Version is stored the the UGeneralProjectSettings Class-Default Object (CDO). A CDO contains the default values for that class type. The “Default” ProjectVersion member contains the current project version. So, all we need to do is update the CDO and tell UE to flush the new value out to disk (DefaultGame.ini). Super simple.
So. How do we get the CDO? If we want to modify the value, we have to get it via GetMutableDefault. This will read the version number string, and this is also where we can modify the value:
// Get the ProjectSettings "Class Default Object"
// The CDO's ProjectVersion member is what we're trying to increment.
// Since we're going to modify the value, we'll need a "Mutable" copy of it.
UGeneralProjectSettings* ProjectSettings = GetMutableDefault<UGeneralProjectSettings>();
FString VersionString = ProjectSettings->ProjectVersion;
Now we have the Project Version string, which probably looks a little like “1.0.0.0”. To increment it, we’re just going to split the string into an array of sub-strings delimited by “.”.
// Break the version number into strings separated by "."
TArray<FString> VersionNumberStrings;
VersionString.ParseIntoArray(VersionNumberStrings, TEXT("."), 1);
Now we probably have 4 strings, each one an integer. The last number, which we’re calling the “Build Number” is the last member of the array.
FString BuildNumberString = VersionNumberStrings[VersionNumberStrings.Num() - 1];
We can use FDefaultValueHelper::ParseInt64 to parse it into a 64-bit integer. Then, we just increment it, stringify it, and update the ProjectVersion string.
We will need to ensure the new CDO value is flushed to DefaultGame.ini. For ProjectSettings we can use ProjectSettings->UpdateSinglePropertyInConfigFile to flush the value.
The whole increment sequence:
// We're going to assume the last string is an int.  It's this we want to increment
int64 BuildNumber = 0;

if (FDefaultValueHelper::ParseInt64(BuildNumberString, BuildNumber))
{
    // Success!  We found the build number, so increment it
    BuildNumber++;

    // Find the location the old build number started at.
    int32 LastDelimiterIndex;
    if (VersionString.FindLastChar('.', LastDelimiterIndex))
    {
        // Trim the last build number
        VersionString.RemoveAt(LastDelimiterIndex + 1);

        // Append the incremented build number to the string
        VersionString += FString::Printf(TEXT("%lld"), BuildNumber);

        // Set the value of the CDO
        ProjectSettings->ProjectVersion = VersionString;

        // Force the updated value to write back out to DefaultGame.ini
        ProjectSettings->UpdateSinglePropertyInConfigFile(ProjectSettings->GetClass()->FindPropertyByName(GET_MEMBER_NAME_CHECKED(UGeneralProjectSettings, ProjectVersion)), ProjectSettings->GetDefaultConfigFilename());
    }
}
We test this out, and find… It works great! The ProjectVersion is indeed incremented every time the project builds now.
However… Your project should be checked into a source control system, such as perforce. Can we automatically check out DefaultGame.ini before we modify it, and submit it automatically after modification? Yes we can!
[Blog Post Update - December 10, 2023:
I’ve recently integrated the solution discussed here into a production project’s Jenkins build. Based on my experience, I find it unnecessary to include Unreal Engine’s Source Control code in such builds. You can effortlessly perform actions like editing, syncing, resolving, and submitting changes in Perforce as a part of your Jenkins build script. This is particularly convenient because your Jenkins setup already has access to Perforce credentials. On the other hand, using Unreal Engine’s internal Perforce integration requires setting up a separate credential store. Given this, it seems more practical to stick with Jenkins for these operations.]
If a Source Control provider is configured in our unreal engine project, we can invoke it like so:
ISourceControlProvider* SourceControlProvider = &ISourceControlModule::Get().GetProvider();
... (do something)
In this case we want to find out if the file needs checked out, and if so - check it out with an FCheckOut operation. This looks like:
ISourceControlProvider* SourceControlProvider = &ISourceControlModule::Get().GetProvider();
FSourceControlStatePtr FileSCCState;
if (SourceControlProvider && SourceControlProvider->IsEnabled())
{
    FileSCCState = SourceControlProvider->GetState(FilePath, EStateCacheUsage::ForceUpdate);

    // We don't need to do anything with source control if the file is already checked-out or added
    bool bAlreadyCheckedOut = FileSCCState && (FileSCCState->IsCheckedOut() || FileSCCState->IsAdded());
    const bool bRequiresSCCAction = FileSCCState && !FileSCCState->IsCheckedOut() && !FileSCCState->IsAdded();

    if (bRequiresSCCAction && FileSCCState->IsSourceControlled())
    {
        if (FileSCCState->CanCheckout() && SourceControlProvider->UsesCheckout())
        {
            TArray<FString> FilesToBeCheckedOut;
            FilesToBeCheckedOut.Add(FilePath);

            SourceControlProvider->Execute(ISourceControlOperation::Create<FCheckOut>(), FilesToBeCheckedOut);
        }
    }
}
After we’ve modified the file, we can similarly submit it to source control by executing an FCheckIn operation:
TArray<FString> FilesToBeCheckeIn;
FilesToBeCheckeIn.Add(FilePath);

TSharedRef<FCheckIn> CheckinOperation = ISourceControlOperation::Create<FCheckIn>();
CheckinOperation->SetDescription(NSLOCTEXT("AutoVersionCommandlet", "UpdateVersion", "AUTOMATION: Update Project Version"));

SourceControlProvider->Execute(CheckinOperation, FilesToBeCheckeIn);
The implementation of a UE commandlet that does all this is here.
Updating ProjectVersion directly (without calling UE)
So, the scheme above works fine. What’s not to like about it?
Well. The UE Editor isn’t exactly a lightweight app. It takes a while to start up, etc. The whole editor has to wake up from its slumber, increment one little number, and go back to sleep. It’s not fast. Also… The commandlet may or may not integrate well with your other automation, such as Jenkins. It requires the user to be logged into Perforce from within Unreal Engine. Yes, we could add an automated login to the commandlet, but this may still be undesirable.
Another way to increment the ProjectVersion is to write a small custom app that increments the version number directly, in DefaultGame.ini. We can do that readily from a Windows console app, written in C#. Just… read in the file. Find the version #. Rev it, and save the file.
string[] FileLines = System.IO.File.ReadAllLines(PathToDefaultGameINI);
bool bFileDirty = false;

for(int i = 0; i < FileLines.Length; ++i)
{
    string Line = FileLines[i];

    if(Line.Trim().StartsWith("ProjectVersion="))
    {
        string[] VersionNumbers = Line.Split('.');

        if(VersionNumbers.Length > 0)
        {
            string BuildNumberString = VersionNumbers[VersionNumbers.Length - 1];

            long BuildNumber;
            if(Int64.TryParse(BuildNumberString, out BuildNumber))
            {
                BuildNumber++;
                string EditedLine = FileLines[i].Substring(0, FileLines[i].LastIndexOf('.')+1);
                EditedLine += BuildNumber.ToString();
                FileLines[i] = EditedLine;
                bFileDirty = true;
                break;
            }
        }
    }
}

if(bFileDirty)
{
    System.IO.File.WriteAllLines(PathToDefaultGameINI, FileLines);
}
Updating the version number string work similarly to the C++ commandlet above. Start by splitting the version number by “.” as a delimiter, parse the last field into an int, increment it, then replace the tail end with the new value.
Welcome to P4
So, what about version control? Can we do that in our custom app? Yes, we can. Since we’re using Perforce, we’ll use the Perforce .NET API.
The Perforce .NET API documentation demonstrates how to log the app/api into perforce. See the docs.
Once we log the into perforce (see the p4api.net examples) we can P4 edit DefaultGame.ini, using EditFiles.
string PathToDefaultGameINI = Path.Combine(UnrealProjectDirectory, "Config\\DefaultGame.ini");
 FileSpec DefaultGameFileSpec = new FileSpec(null, null, new LocalPath(PathToDefaultGameINI), null);
 Options EditOptions = new Options();
 con.Client.EditFiles(EditOptions, DefaultGameFileSpec);
Submitting the file after we edit it is just as easy via SubmitFiles:
SubmitCmdOptions SubmitOptions = new SubmitCmdOptions(SubmitFilesCmdFlags.None, 0, null, "AUTOMATION: Update Project Version", null);
FileSpec DefaultGameFileSpec = new FileSpec(null, null, new LocalPath(PathToDefaultGameINI), null);

con.Client.SubmitFiles(SubmitOptions, DefaultGameFileSpec);
So, how exactly DID we log into perforce? Where exactly did these credentials come from? Well, we can store them in a JSON file and parse them before we log in.
string CredentialsJSON = System.IO.File.ReadAllText(PathToP4Credentials);

P4Credentials = JsonSerializer.Deserialize<P4Credentials>(CredentialsJSON);

string uri = P4Credentials.ServerUri;
string user = P4Credentials.P4User;
string ws_client = P4Credentials.P4Client;
string pass = P4Credentials.P4Password;
Note: It’s really super bad practice to store the password on disk like that. You shouldn’t do it in real life. Typically, the password would come from an environment variable.
A full C# example is here.
Full Unreal Engine Project with both solutions
For a working example, see GitHub:
https://github.com/gamergenic/automatic-update-ue-projectversion
I could not find any official means to rev the Project Version. If you’re aware of a better way, feel free to let me know!
Hopefully this helps someone out there! If not, I shoulda been fishing.
